Last year, Haley and I went to a great wedding that had the most amazing tempeh. The marinade was absolutely insane. They didn’t have a real recipe, but this is the gist of it. Make this.
After making it a few times, I’ve added a couple of ingredients, so this isn’t the exact wedding recipe. Soy sauce even things out. Syrup/sweetener boosts flavor development when you cook it, while also helping the marinade “stick” a bit. I’ll sometimes add a bit of MSG, cuz why not?
Apple Cider Vinegar Olive Oil Syrup(I use maple syrup or brown rice syrup) Water Soy Sauce Salt Nutritional Yeast Sumac Mushroom Powder Grated Ginseng* Grated Garlic*
Whisk to combine. Coat/marinade tempeh. Bake at ~375 for ~60 minutes, flipping and basting the tempeh every 15 or so minutes.
* I think grating/microplaning your ginseng and garlic is worth the effort. I’ve found that chopping, even really well, doesn’t release as much flavor into the sauce. It’s not required.
Here’s Haley on the ground eating the tempeh. This proves how delicious it is.
What is seitan? Seitan is wheat gluten prepped in various ways. This is flour washed until the starches are gone, leaving mostly gluten protein behind. It’s eaten in SE Asian countries a lot more often than western ones. It’s also known as mianjin, fu, milgogi, wheat meat, or gluten meat.
Seitan is extremely high in protein. This recipe comes out to ~25% protein by weight.
One of the reasons that seitan is called “wheat meat” is because you can mimic meat textures with it. Gluten is an incredible building block ingredient. Seitan can imitate just about any meat texture. It’s really fun. Technique is very important though.
Seitan texture is determined by how the gluten is worked and set when cooked. What I mean by this is tension. Think of it kind of like pulling a rubber band near it’s breaking point. Gluten wants to relax and go back into a ball. We can use this to our advantage by forming long strands and then creating knots to hold that tension. Then we cook it to set it into place. This is how we mimic long muscle fiber strands, like beef or chicken. For a loaf texture don’t knot it.
If you want lil popcorn chicken bites, you can do that. If you want a meatloaf texture, you can do that. If you want a bacon strip texture, you can do that. If you want a sausage situation, you can do that. Seitan is extremely versatile. I make a vegan musubi loaf that is amazing. I also adapted this for gyro meat. It makes amazing breaded and fried chicken strips. Seitan is amazing fried.
Shaping the dough is extremely important because it directly determines the “texture” of your seitan. I can’t stress enough how important technique is here. Watch a few videos on this. In the future I’ll possibly make a how-to video on this. It took me quite a few tries before it clicked.
My recipe is adapted from Green Edge Health on Youtube. Here’s a link to the video.I would strongly recommend watching the video because it has some great tips for shaping the dough. It’s also just a good video.
Quick Tips and Tweaks
When forming the dough work quickly. Watch the video a few times. Have everything on hand before you begin. Gluten relaxes which changes how you can work with it. Working swiftly at the knotting stage makes this recipe a lot better.
Wrap the knotted balls as tightly as possible. This holds everything in place. You don’t want your seitan expanding or changing shape as it cooks.
Chicken Texture – Focus on the knots. Keep the dough under as much tension as possible. Keeping it under tension keeps the protein strands long which is what mimics muscle fiber.
Loaf Texture – Don’t forcus too much on the knotting. Just roll and go.
Finely diced yellow/white onion is a great filler ingredient for loaf texture. About 1/2 a medium onion.
1-2tbsp of soy sauce is a nice tweak.
There is a sauce called Maggi which is really, really good to add if you’re going for a beef flavor. It’s a switzerland invention. It’s amazing. I usually add about 1.5-2 tbsp of it. This also helps darken the seitan for a different appearance.
Add a few grams of dry ingredient along with any wet to even the moisture.
Ingredients
Water 480 mL Veg Oil 1tbsp Apple Cider Vinegar 1tbsp White Miso Paste 2tbsp Veg Bouillon Concentrate 1tbsp
Pea Protein 70g Vital Wheat Gluten 240g Nutritional Yeast 20g Salt 1tsp Garlic Powder 2tsp Onion Powder 1 Tablespoon White Pepper Powder .5tsp wahtever else you want
Mixing
Weigh everything on a scale. Wet then dry. Throw everything into a minimum 1000w blender or food processor and let ‘er rip. The dough will come together into a pretty shaggy ball. Once it can hold it’s shape, divide the dough into 4 parts, then process each ball for ~90 seconds, until the gluten slaps and clings to the sides.
Dividing up the dough is a way of going easy on the equipment. Working gluten requires a lot of torque. There is a decent chance your equipment will overheat. If you have powerful equipment feel free to do larger batches.
I’ve put two videos below. You can see the difference in the dough texture.
Stretching and Knotting
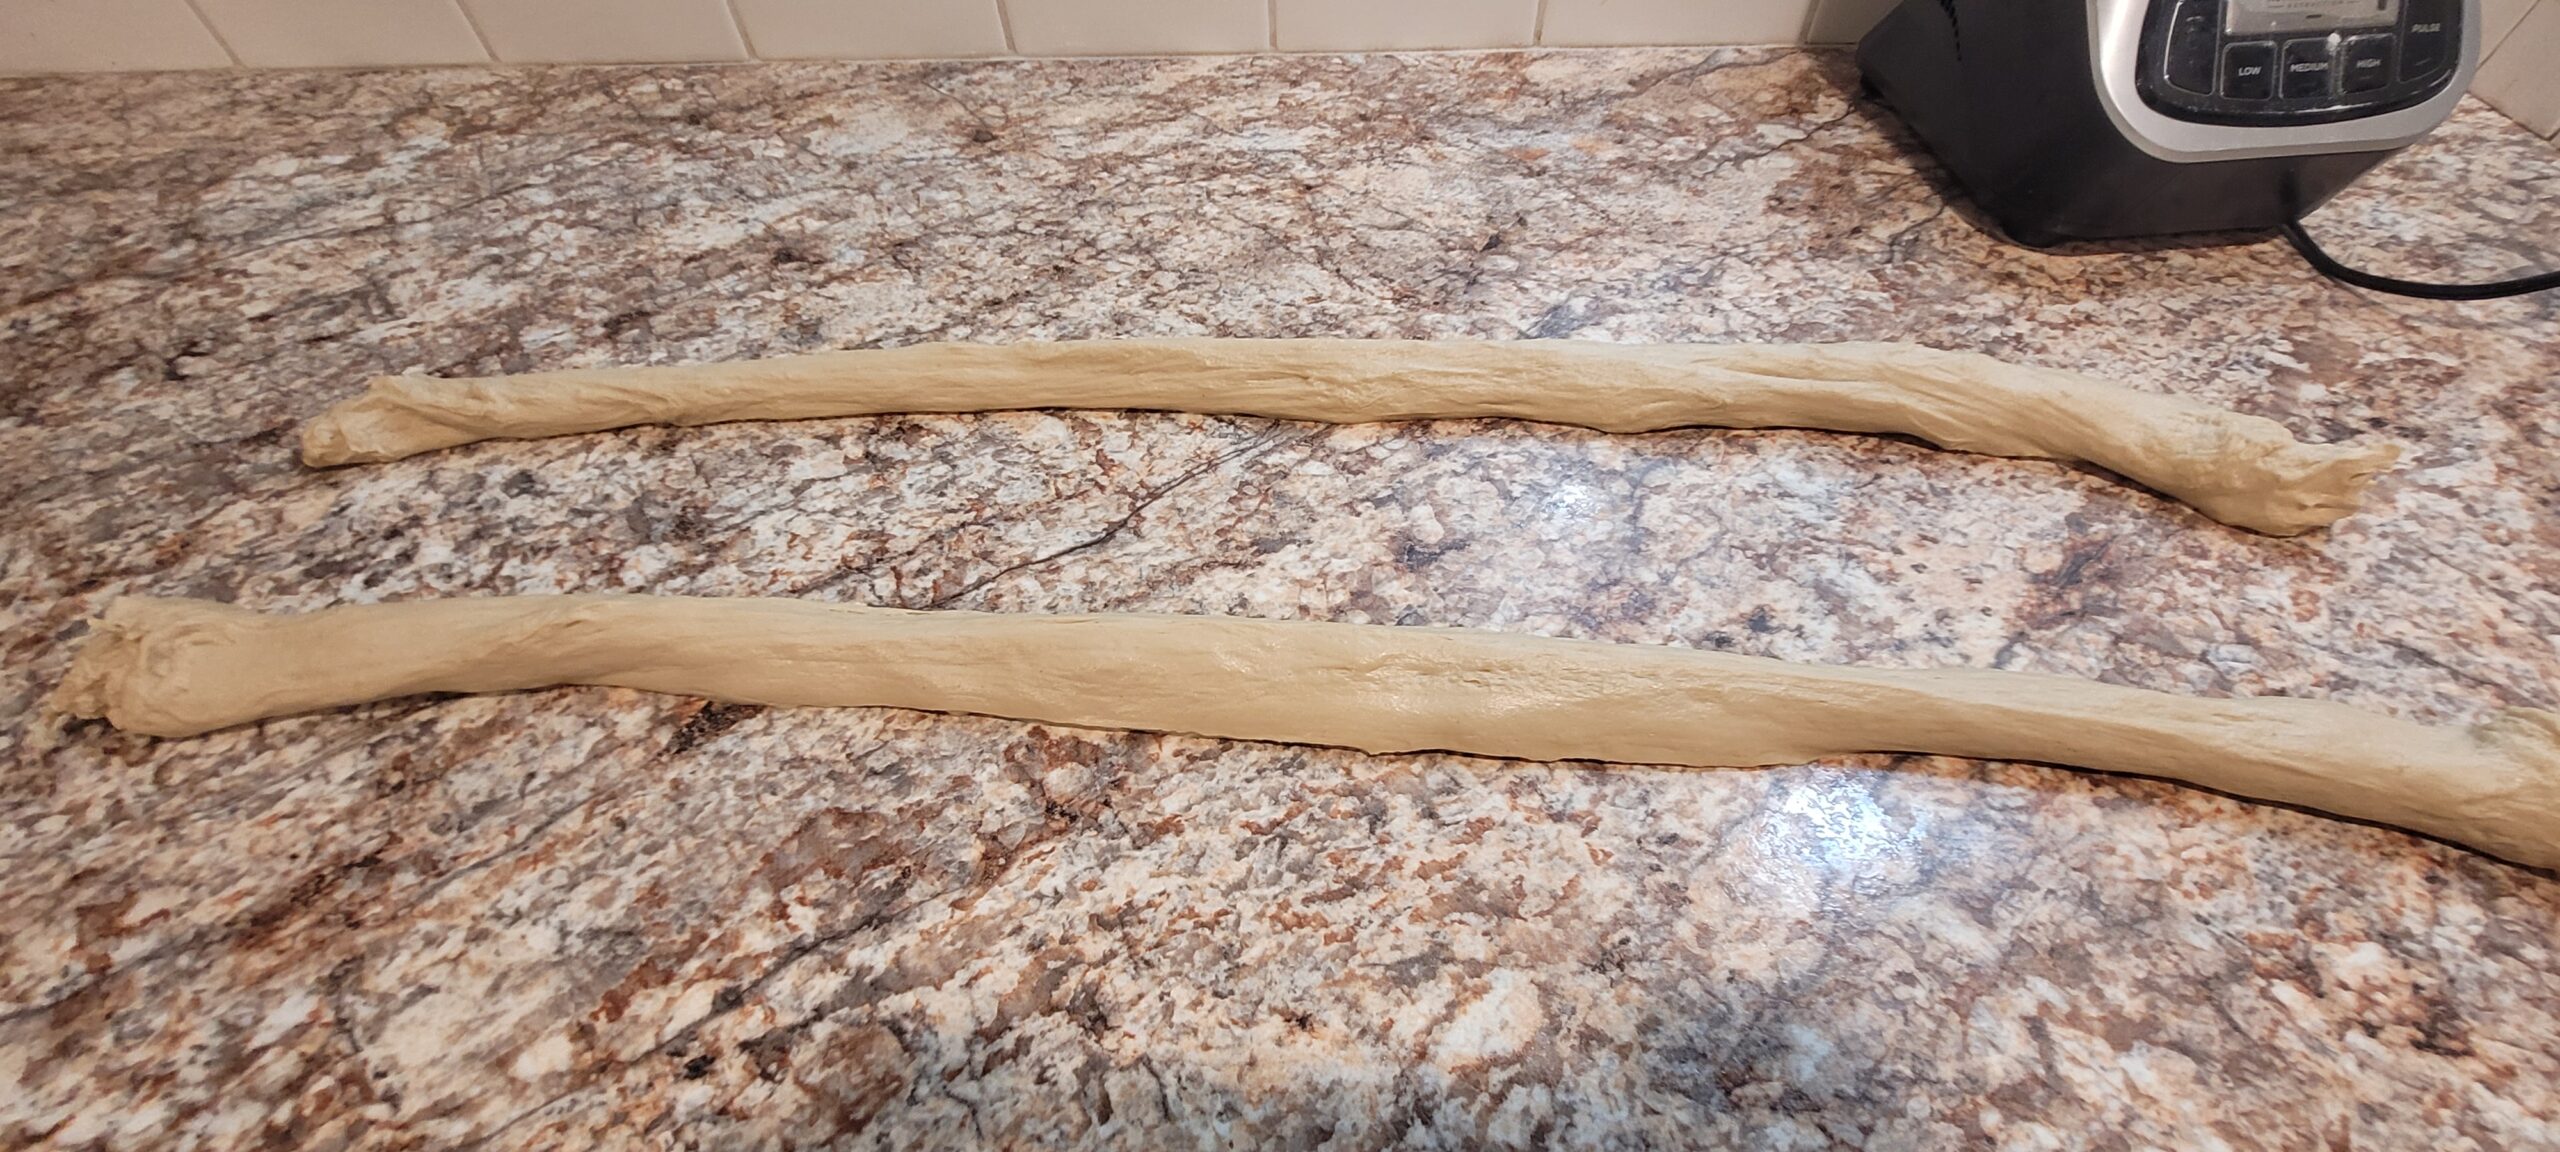
Wait 15-20 minutes for dough to relax. Form 2 balls with the dough. Slowly stretch them into long strands.
There are a few different ways to make these strands: Pulling, Swinging, the Counter. Pulling and swinging are pretty self-explanatory I think. The counter technique uses the stickiness of the seitan on a dry counter to let us hold it in place. In practice, this looks like slapping the seitan onto the counter then pulling on it as it sticks to the counter. It’s fun.
If your dough is too wet it will crumble apart at this stage. If it is too dry it will snap apart suddenly. I usually look for a smooth exterior.
These are decent strands.
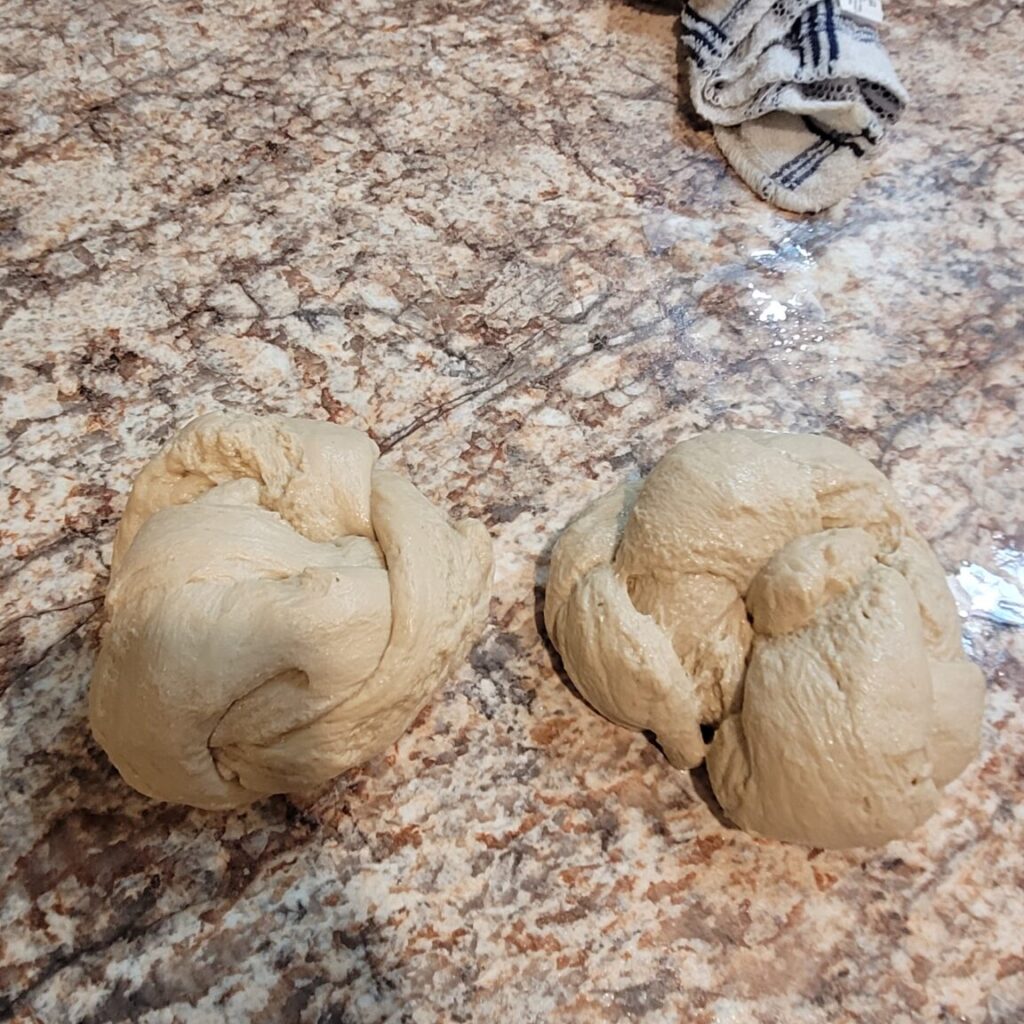
Now form them into knotted balls. Over and under.
Keep the tension. Wet your hands with water or oil if you need to. Watch the videos again if you need to. Be confident. Pay attention to how the gluten feels, that tension. The way tension builds in gluten as you pull on it is important.
This is like pizza dough in that it can smell your hesitation from a mile away. You flinch, you die.
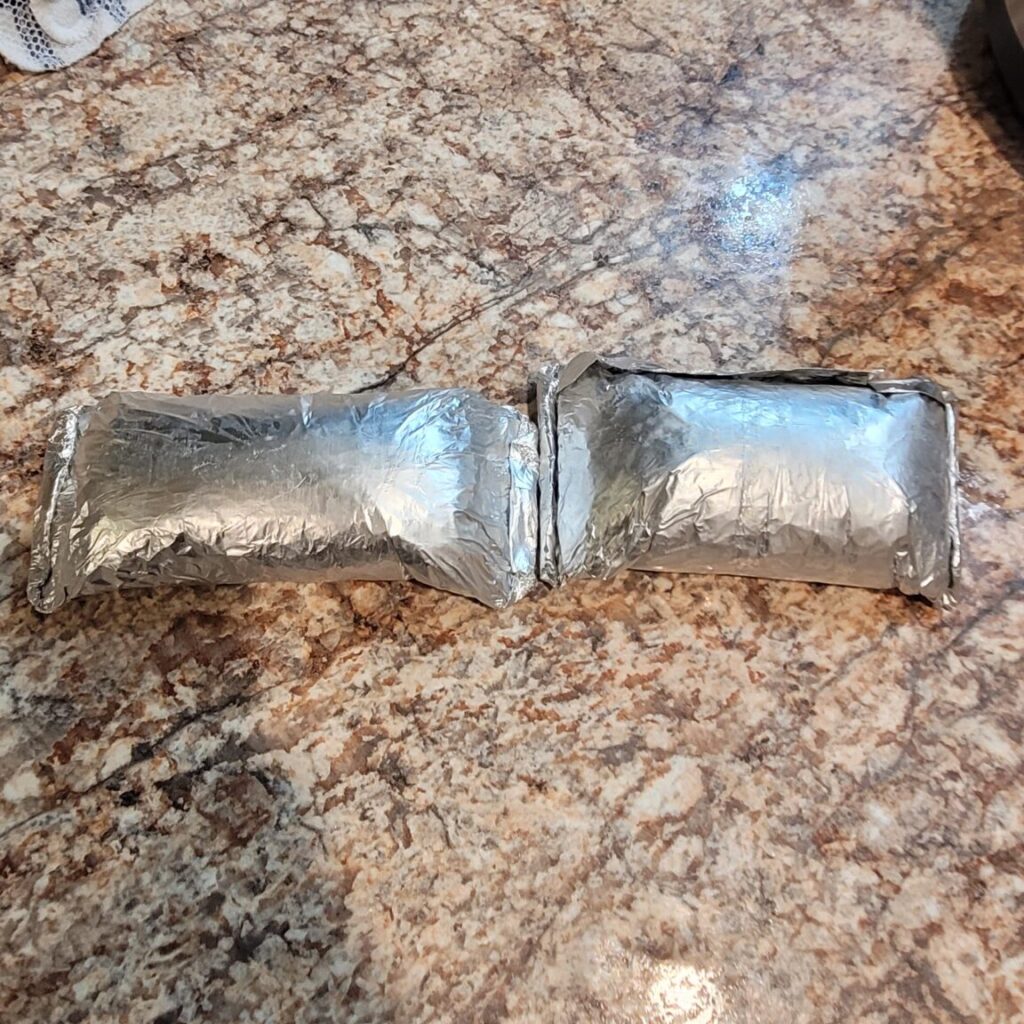
Now wrap em up. 1 layer parchment paper. 2 layers aluminum foil.
Pay attention to your edges and wrap it tight. The purpose here is to compact everything to keep tension. Video for wrapping.
Cooking
I pressure cook them for ~90 minutes and then let it vent/cool naturally. If you release pressure there is a high likelihood of the seitan expanding rapidly which ruins the texture. Interesting note, though, is that rapid expansion does create a really good ground sausage texture. Seitan rules.
Steaming for a comparable time also works.
You should be left with some lil loafs like these. The texture and knotting are visible.
Leave as is and slice off pieces or pull it apart however you want. You’re left with something like this.
I recommend quickly steaming seitan when you cook with it. Just a really fast flash steam in a pan. It helps eliminate any remaining wheat/gluten flavor. Seitan takes up marinade extremely well. It also loves a nice sugar glaze in a pan for the sear. No need to steam if frying, although that may help it hold moisture in a breaded situation.
Seitan is incredibly versatile. Unless it gets burnt, there’s no real messing it up. Every mistake is a happy accident.